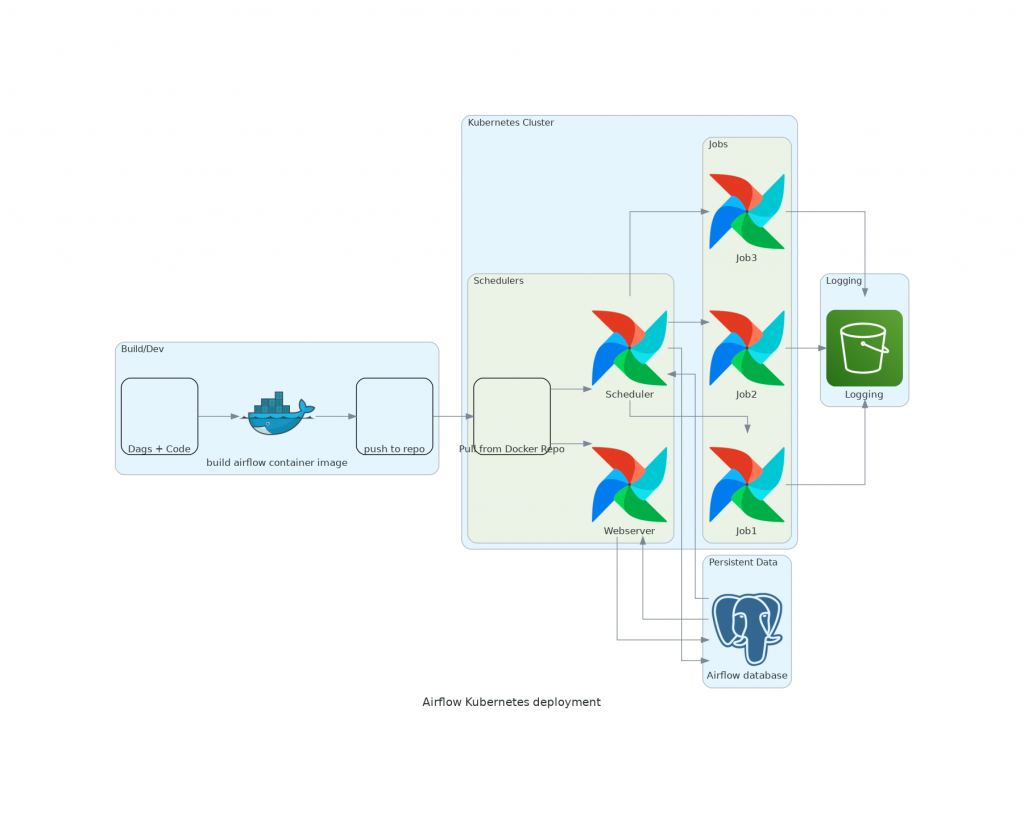
TL:DR
There is an airflow docker image and helm template available here. You can extend the airflow docker image with your own etl code and dags by copying it into the Docker image. Then push it to a docker registry and deploy it using the helm chart filling in the necessary names and tags.
How to deploy airflow with the Kubernetes Operator.
Deploying Airflow to Kubernetes solves many of the management issues of servers and scalability with airflow. One of the most written about deployment patterns out there has been using the Celery Executor pattern. This uses a message queue between the scheduler and the workers to keep things up and running. This introduces some complexity both in terms of managing your queues and that these components need to be kept up and running as well or you lose your task queue. This requires more failsafes and more management. It is also not easy to manage autoscaling in this configuration without a lot of work and/or various solutions people have come up with wort a mention here is the excellent Astronomer has their custom solution KEDA to manage autoscaling with celery workers https://www.astronomer.io/blog/the-keda-autoscaler/. But for this we want to run airflow on Kubernetes with the native operator and all the autoscaling baked into Kubernetes pod scheduling and be able to configure our resource usage at the task level or run entirely separate containers.

Why do this?
Airflow is an industry standard tool for running batch workflows. If you have a lot of data that needs processing and running around. Airflow is a practical way to do it to an enterprise level that doesn’t require special proprietary tools and licences. Running Airflow on kubernetes allows you to leverage Kubernetes to manage your server and computing power and save a lot of the headache of managing your compute instances. Saving a lot of operational work for a data engineering team that probably has less in the way of dev-ops/infra capacity. Using the helm deployment packages with this recipe allows you to bring up airflow instances in a reusable manner so you can keep pushing new version of your etl jobs.
Requirements
- Kubernetes Cluster
- Code and dags you want to run.
Main Components
- Airflow Containers
- Database
- Logging
- Build an airflow container
Build up an airflow container that initializes airflow as a webserver or a scheduler and push it to a registry. You will want to automate this deployment process from git. I wouldn’t recommend pulling directly from Git to a container as it is easier to check dependencies and test when packaging the container as one immutable unit. Because you’re using the kubernetes operator restarting your scheduler doesn’t matter mid job, Kubernetes will continue running the pods and when the scheduler is back up it will pick up all the running jobs. Version your containers. It will make your life easier and make your builds repeatable.
- Set up database
It is 100% workable to set up a database and associate a volume on Kubernetes. In the helm chart linked above there is an option to create a database to act as your backend. However, just because you can doesn’t mean you should. Volume/stateful management is fraught with risks when it comes to Kubernetes. Especially when your deployment Is to be deployed as a permanent workload your life will be less stressful using a managed db. Unless you’re managing thousands of jobs a minute you likely wont need to use more than a small sized instance.
- Set up logging
Remote logging is pretty much essential to any distributed airflow setup. But doing it on k8s it is essential as the pods are transient by nature.
To configure remote logging with airflow it breaks down to the following steps
- Set up a connection with your remote logging store airflow docs
- Set remote_logging to true and set the remote_logging_conn_name to the connection you just set up.
- Set the path of where you want to log files to.
- Set up services/Ingresses
Create a service object pointing to your webserver component.
{{ if .Values.airflow.webserver.enable}}
apiVersion: v1
kind: Service
metadata:
  name: "{{ .Release.Name }}-ui-service"
  namespace: {{ .Release.Namespace}}
  labels:
    app: "airflow-cluster"
    component: webserver-ui
spec:
  ports:
    - port: 80
      targetPort: webserveruiport
      protocol: TCP
      name: http
  type: NodePort
  selector:
    app: "airflow-cluster"
    component: webserver
{{ end}}
Helm chart defining UI service for airflow webserver
then create an ingress pointing to your service component.
{{ if .Values.airflow.webserver.ingress.enable}}
apiVersion: networking.k8s.io/v1beta1
kind: Ingress
metadata:
  name: "{{ .Release.Name}}-ui-external-ingress"
  namespace: {{ .Release.Namespace }}
{{- with .Values.airflow.webserver.ingress.annotations }}
  annotations:
{{ toYaml . | indent 4 }}
{{- end }}
  labels:
    app: {{ .Release.Name}}
spec:
  rules:
    - host: {{ .Values.airflow.webserver.ingress.host }}
      http:
        paths:
          - path: /*
            backend:
              serviceName: "{{ .Release.Name }}-ui-service"
              servicePort: http
{{ end}}
Ingress object pointing to the service the points to the airflow webserver container port (often 8080 or 8000)
- Manage deployment
Create deployments for your webserver and scheduler components. Manage your webserver with a rolling update and your scheduler with a recreate type deploy. At this point you’re probably realizing there are quite a few components and deployments to manage here. Fortunately the wonderful world of Kubernetes provides Helm. Which I would highly recommend as a means to quickly install and manage upgrades of all airflow components at once for your cluster. While your scheduler and webserver handle the creation of tasks. You manage the creation of jobs.